How many times do you as a designer pull out your cell phone and snap a picture?
Maybe you just finished a room and you need for the shot to show your work in the best possible light.
Here are a few tips that can optimize cell phone photography without bogging you down in photography arcana.
These tips are suggested by Edward Chittenden, a photographer who specializes in interior work and who also (full disclosure) is my son.
How Much Light Does Your Picture Need?
The word for this is exposure. How much light do you need to expose the important elements in your picture?
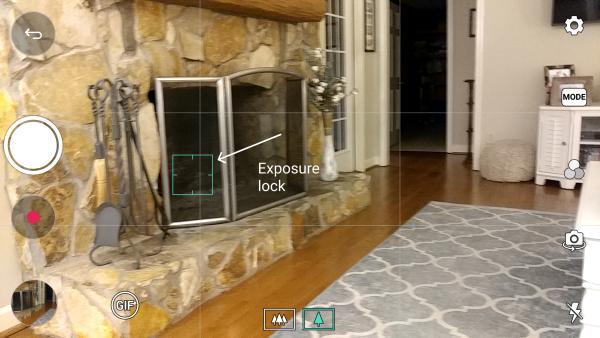
When your phone camera is set to automatic, you will see a square or a circle called an exposure lock.

Here is a screen shot with a round exposure lock.
Here is a square exposure lock.
If you don't see the square or circle in your camera, touch the screen with your finger and it will appear.
The exposure lock is your way to set the optimal amount of light for your picture.
You set the exposure lock by placing your finger on the screen on the back of the cell phone.
The issue is: where do you place your finger?
Tip #1 - Use Your Exposure Lock for Optimum Lighting
Begin by placing the exposure lock in a dark spot in the room. This will tell your camera to let in more light and brighten up the room. Place your finger on a shadow in the room and you will see the place brighten up immediately. Then snap!


Place the exposure lock too close to a light source and you will see something like this. The exposure lock has set the camera to expose the features in and outside the window and left the interior dark.
Place your finger to move the exposure lock to different parts of the room and watch the lighting change. Shoot several lighting configurations.
Tip #2 - Line Up Your Shot To Eliminate Spatial Distortion
Whew. That sounds complicated! But it's not really. Take the picture from a height between your waist and your chest.
It will look far more natural!
Take picture from eye level and rooms can get bent out of shape.
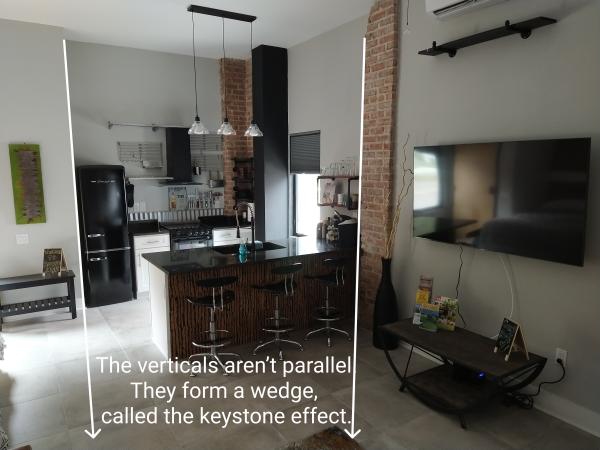
Shot with phone camera at eye level or higher. Vertical lines form a "keystone," which will not register as true to the eye.

The same kitchen scene shot with the phone camera at waist-level. No keystone effect. Vertical elements remain vertical.
Tip #3 - Turn on the Lights?
Not if you can avoid it! The warm cast of artificial lighting and the natural light coming from a window don't play well together with cell phone cameras. In short, the window light will appear unnaturally blue in your pictures.

With the lights turned on, the natural light from the windows turns unnaturally blue.

The same scene with all natural lighting.
Tip #4 - Blow out the window
You are most likely interested in the interior and not in what's visible outside a window. You can control this with your exposure lock.
This shot is exposed for the what's in and outside the window frame. You can see the exposure lock on the window.

Here the camera is set to expose the interior. You can see where Edward placed the exposure lock in the upper left of the picture. He calls this, "blowing out the window."
Tip #5 - Reflective objects in your picture

You probably don't want a reflection of you taking a picture in your picture. Be aware of reflective surfaces in the shot.
Tip #6 - Clean the lens!
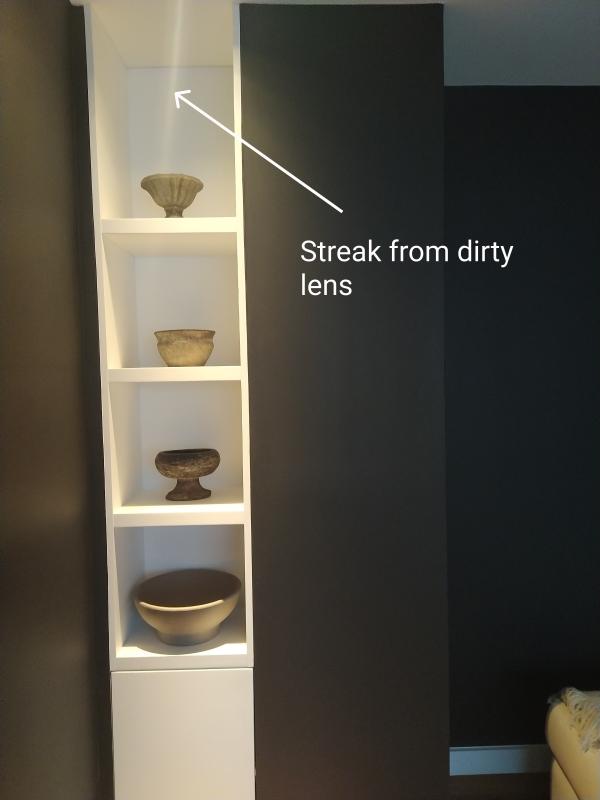
'Nuf said.
As Edward always tells me, it's not one big thing that makes great photos; it's lots of little things.
With a little practice you can quickly learn to employ these tips automatically. You will love the difference!
Edward Chittenden

Edward is an architectural and interior photographer who has been in business in Tampa for eight years. You can see his work on his website, Natural Light Photography.
Closeouts
Tampa

Dixie home Eminence 6672
Chestnut
12 x 40’6 or 54sy material only
Entire roll
Designer net $2160
Close out $1000.00
Orlando

ARTISTICA CF-7
Bge/Lt Blue
SIZE 8X10'4, 82.64 SF
Designer net $4132
Close-out price $2000

#30065
CHOC/BEIGE
6'1"X9'3" OR 56.33 S/F
Regular designer net $3718
Close-out price $1800
Addison/Dicus & Bailey Close Out Policy
The best way to find out about our latest closeout is to subscribe to our newsletter.
You must have an account with Addison/Dicus & Bailey to buy one of these rugs.
The closeout offers will begin when we send the newsletter between the 20th and 30th of each month and last for 30 days.
No returns. No showings in homes.
Rugs can be picked up at the showroom, or we can arrange for home delivery and set up for an extra charge.
These are individual pieces in one size in one color.
First come, first serve.
Don't worry about storage wrinkles. We will steam them out.